Beckwith Strings

Handcrafted Guitars and Stringed Instrument Repair

Next Monthly Jam: May 11th 2025, 12pm-3pm

Beckwith Strings in the News!

  • Home
  • Stringed Instrument Repairs
  • About
  • Custom Guitars
  • Guitars
  • Guitar Tips
  • Contact
  • Events

Intonation Explained

February 24, 2014 By Steve Beckwith 7 Comments

Intonation, you’ve heard the term but you may not understand its meaning. When the word arises, think “in tone” or “in tune”.   This article will explain both proper and improper intonation and steps that can be taken to correct the latter.

Intonation On a Stringed Instrument

Intonation is a fretted instrument’s ability to play the correct note at every fretted position on the neck.  As an example, a guitar’s low-E string is tuned exactly at the E note, and fretting the string a another location, say the 3rd fret, you should be playing an exact G note, the fifth fret should be an exact  “ A” and the seventh fret a “B” and so on all the way up the neck.   This concept holds for every string on the instrument.

Getting it Right

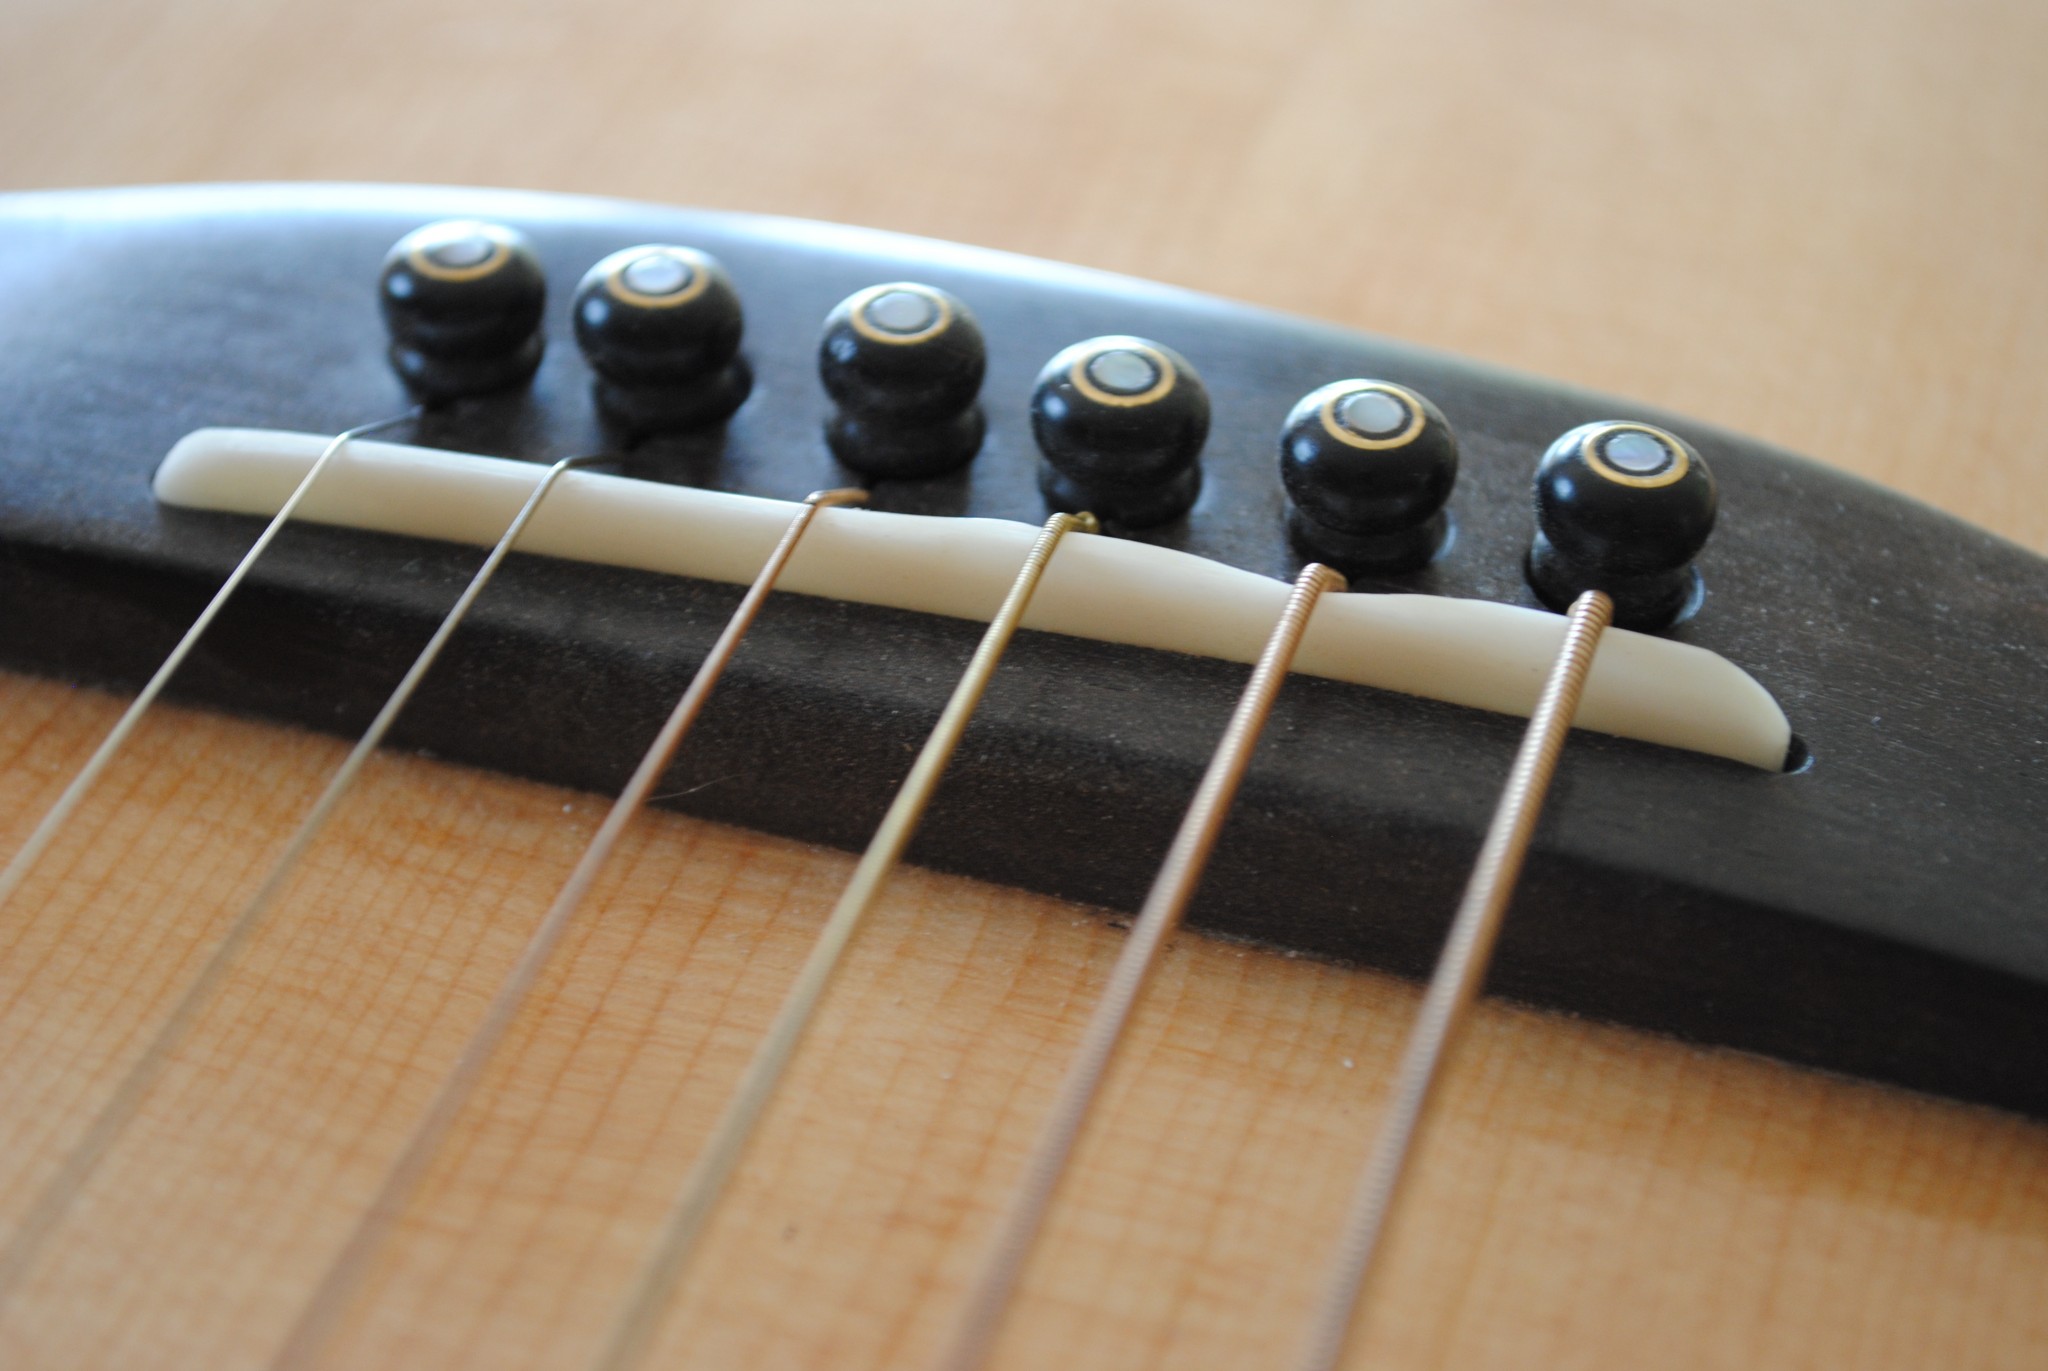
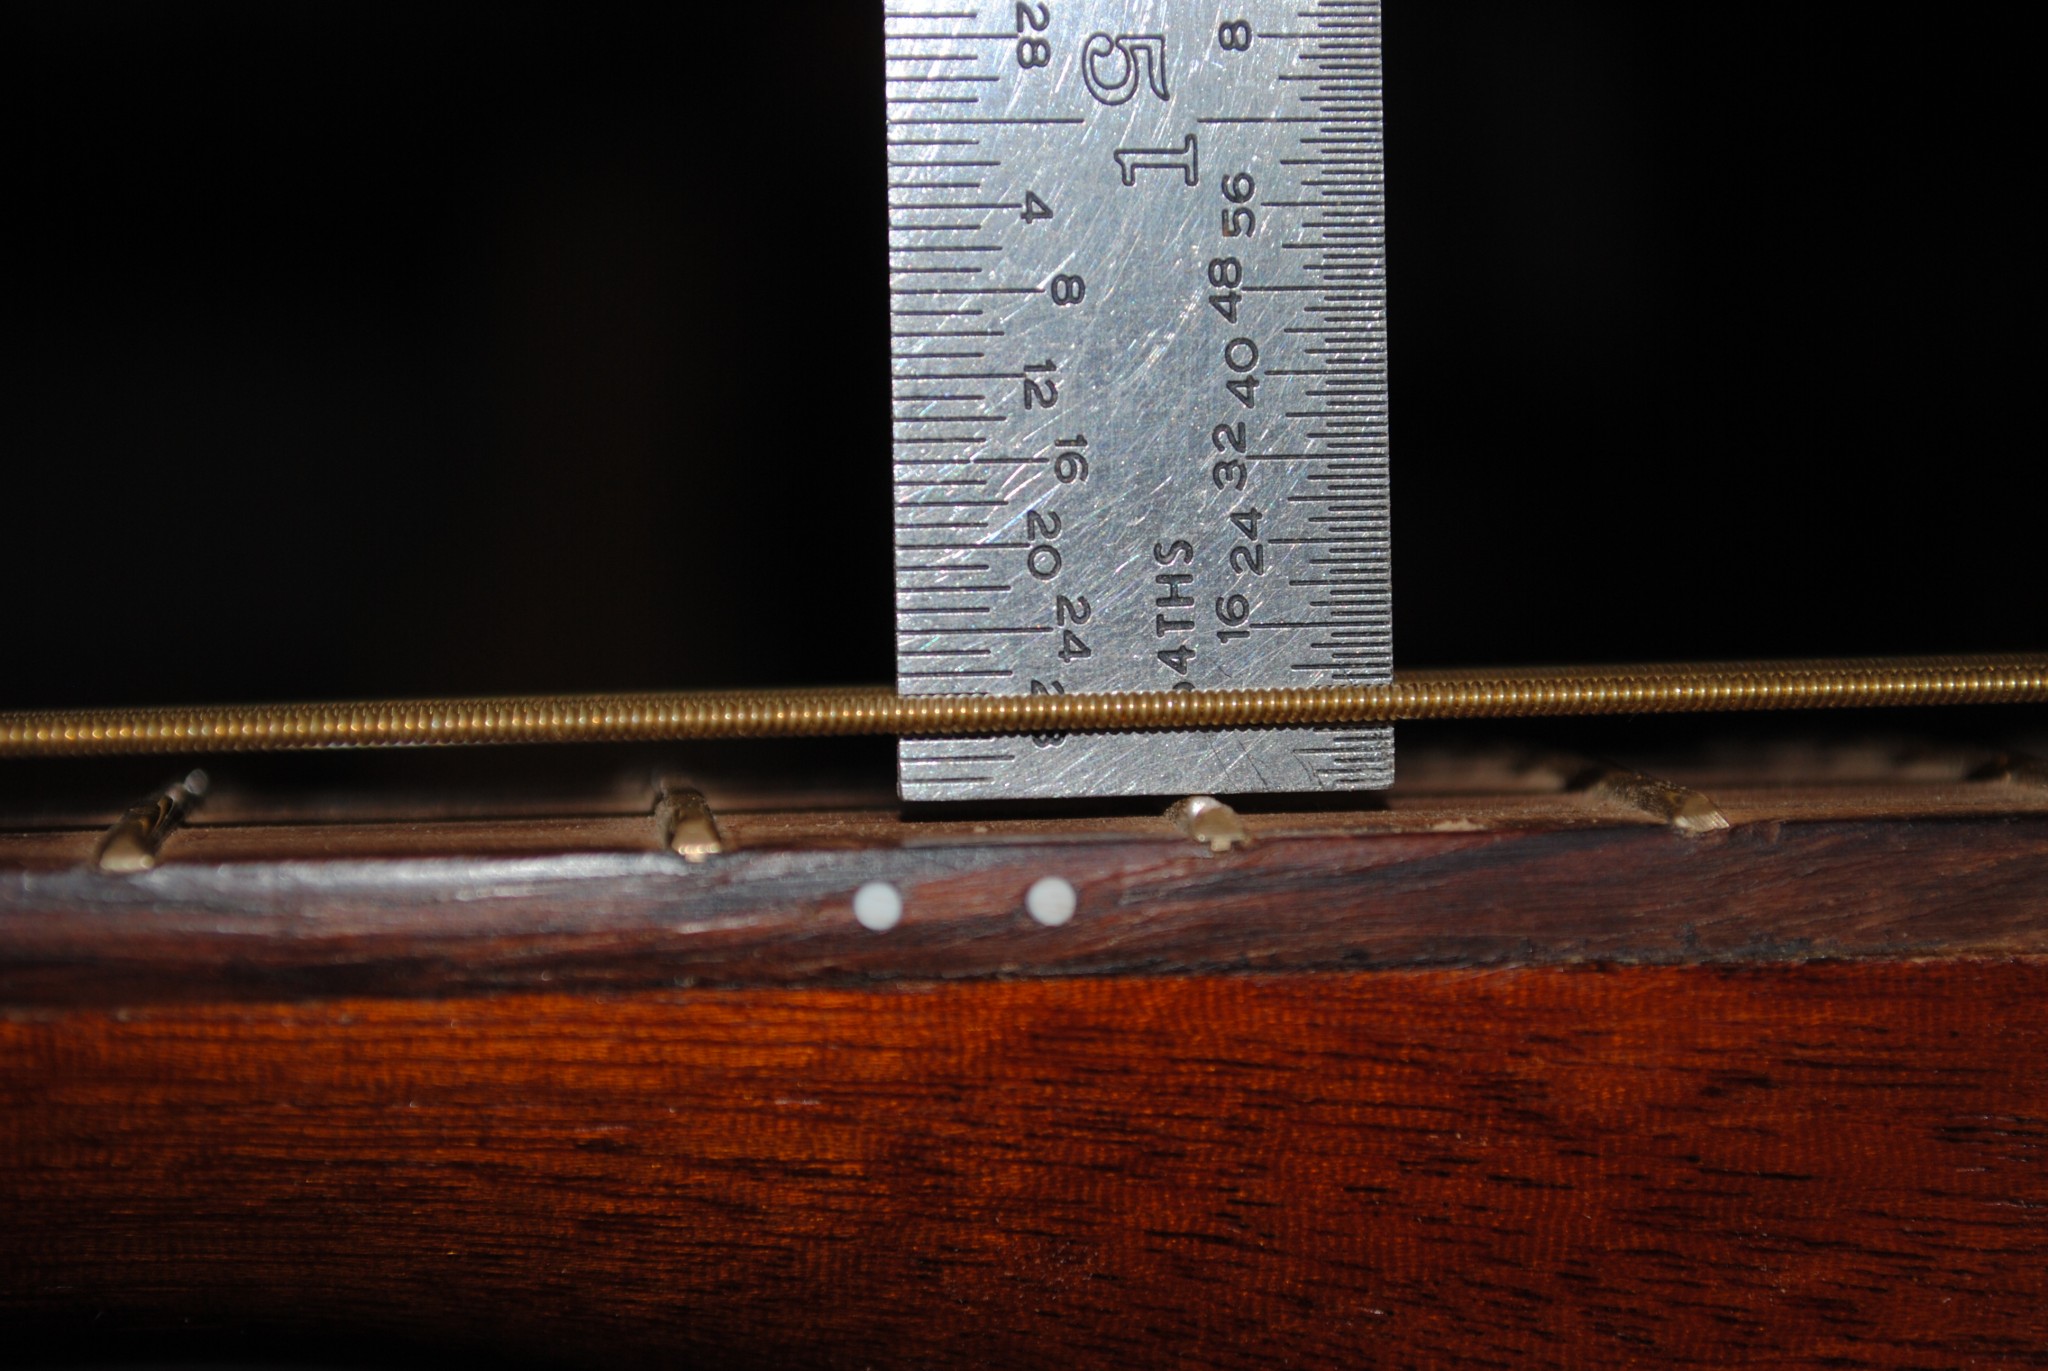
In order to achieve correct intonation, a fingerboard is designed (and built) with the frets placed in a precise location for a specific length of guitar string.    The string length is defined as the distance between the edge of the nut closest to the fingerboard to where the string contacts the saddle.   To account for the differing string thicknesses, the saddle on an acoustic guitar is slanted such the high E-String is closest to the nut with subsequent heavier gauge (thicker) strings are progressively further from the nut (see figure 5 below).

Causes of Poor Intonation

There are two areas in which can cause improper intonation; 1.) the vibration length of the string between the nut and the saddle is incorrect OR  2.) the frets are incorrectly position in the fingerboard.  The first is correctible while the latter is not – unless the fingerboard is replaced.   However, frets being installed out of position is rare and something I’ve never experienced.   As such, that variable can be dropped from this discussion. So let’s concentrate on string length.

We’ll simplify the discussion by focusing on only one fret – the 12th.   This is the octave fret for the fingerboard and should be exactly in the middle of the string when the string is pressed (fig.1).  When plucked, it should be a perfect octave of the open string (unfretted) note.

The saddle is at the exact location so the fretted (pushed-down) string's mid-point is directly over the twelfth fret.
Figure 1. The saddle is at the exact location so the fretted (pushed-down) string’s mid-point is directly over the twelfth fret.

If the string is too long (fig. 2), or two short (fig. 3), the twelfth fret is no longer sitting at the midpoint of the strings and the octave note will be respectively flat or sharp.

Figure 2.  The saddle is to set to far away from the saddle and the length of vibrating string is longer than the non-vibrating length resulting in an octave note that is flat (lower in tone).
Figure 2. The saddle is to set to far away from the saddle and the length of vibrating string is longer than the non-vibrating length resulting in an octave note that is flat (lower in tone).


Figure 3.  The saddle is to close to the twelfth fret and the vibrating string length is to short causing the octave note to be sharp (to high).
Figure 3. The saddle is to close to the twelfth fret and the vibrating string length is to short causing the octave note to be sharp (to high).

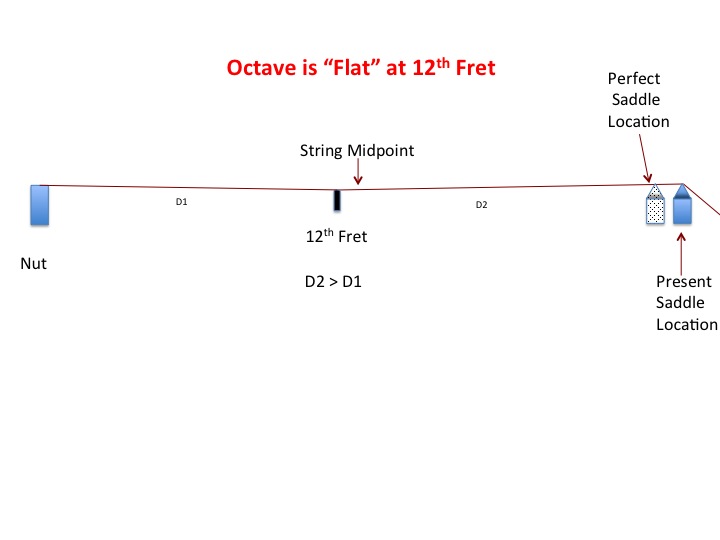
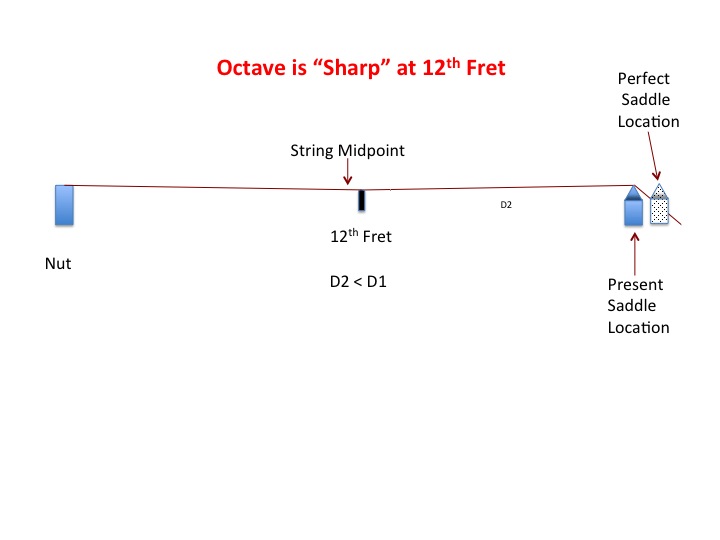
In all these illustrations, it’s important to remember that the twelfth fret is stationary and the   mid-point of the string is moving is shifted in each figure because of the change of string length.

Correcting Improper Intonation

Correcting a string’s vibration length discrepancy may be as simple as reducing the height of the string over the fret’s  when fretted (pushed-down)  A string sitting high over the fingerboard is stretched enough to change it’s vibrating length resulting in an intonation issue.   A proper set-up (see the previous blog) could be all that is needed to correct the discrepancy.

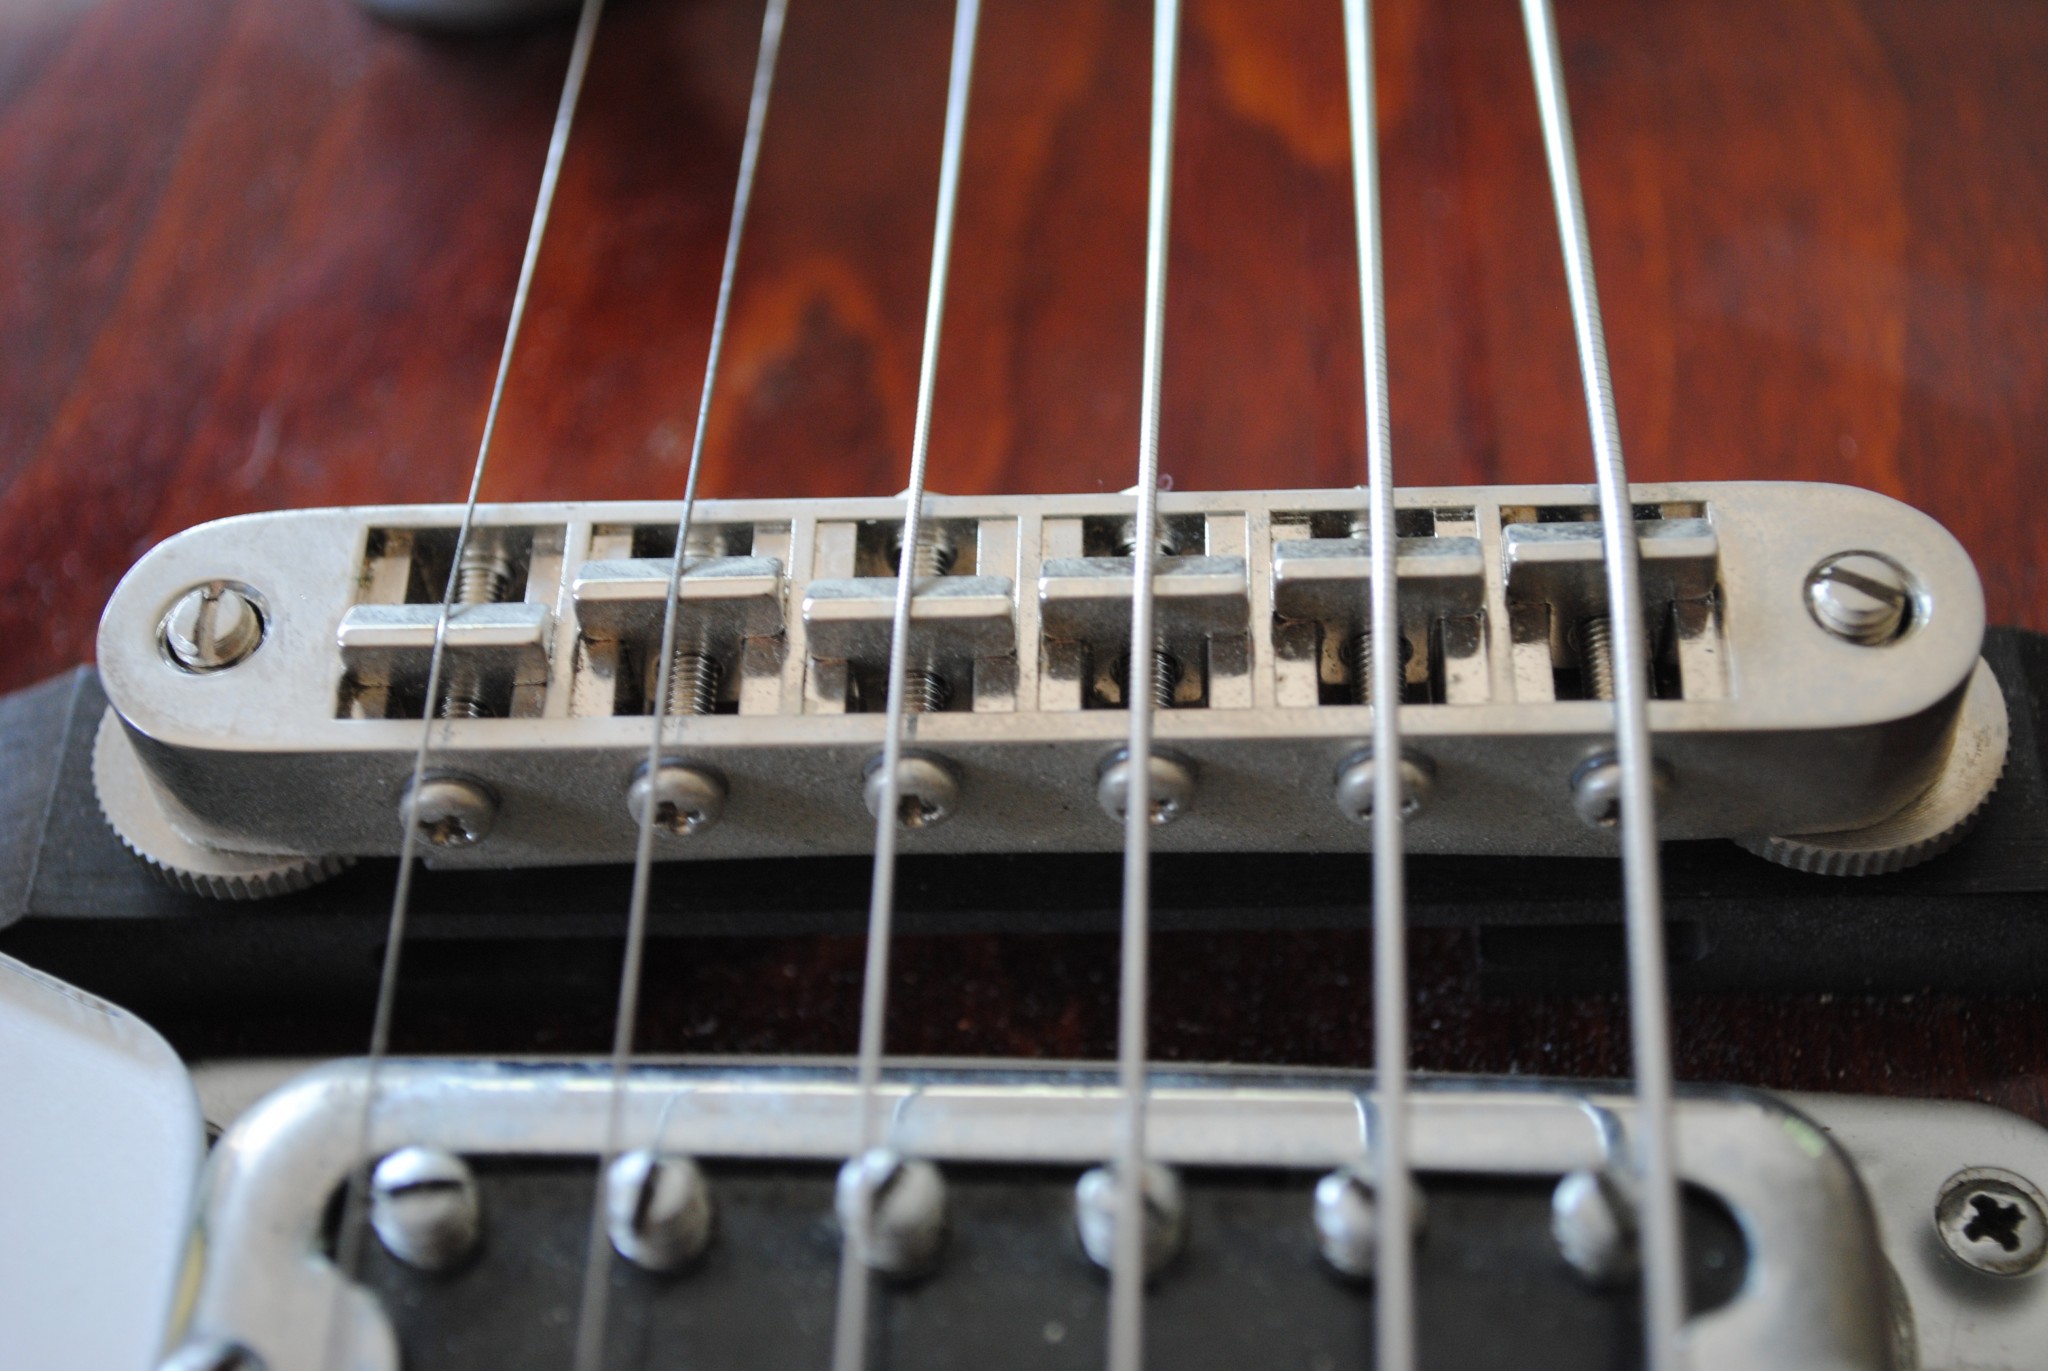
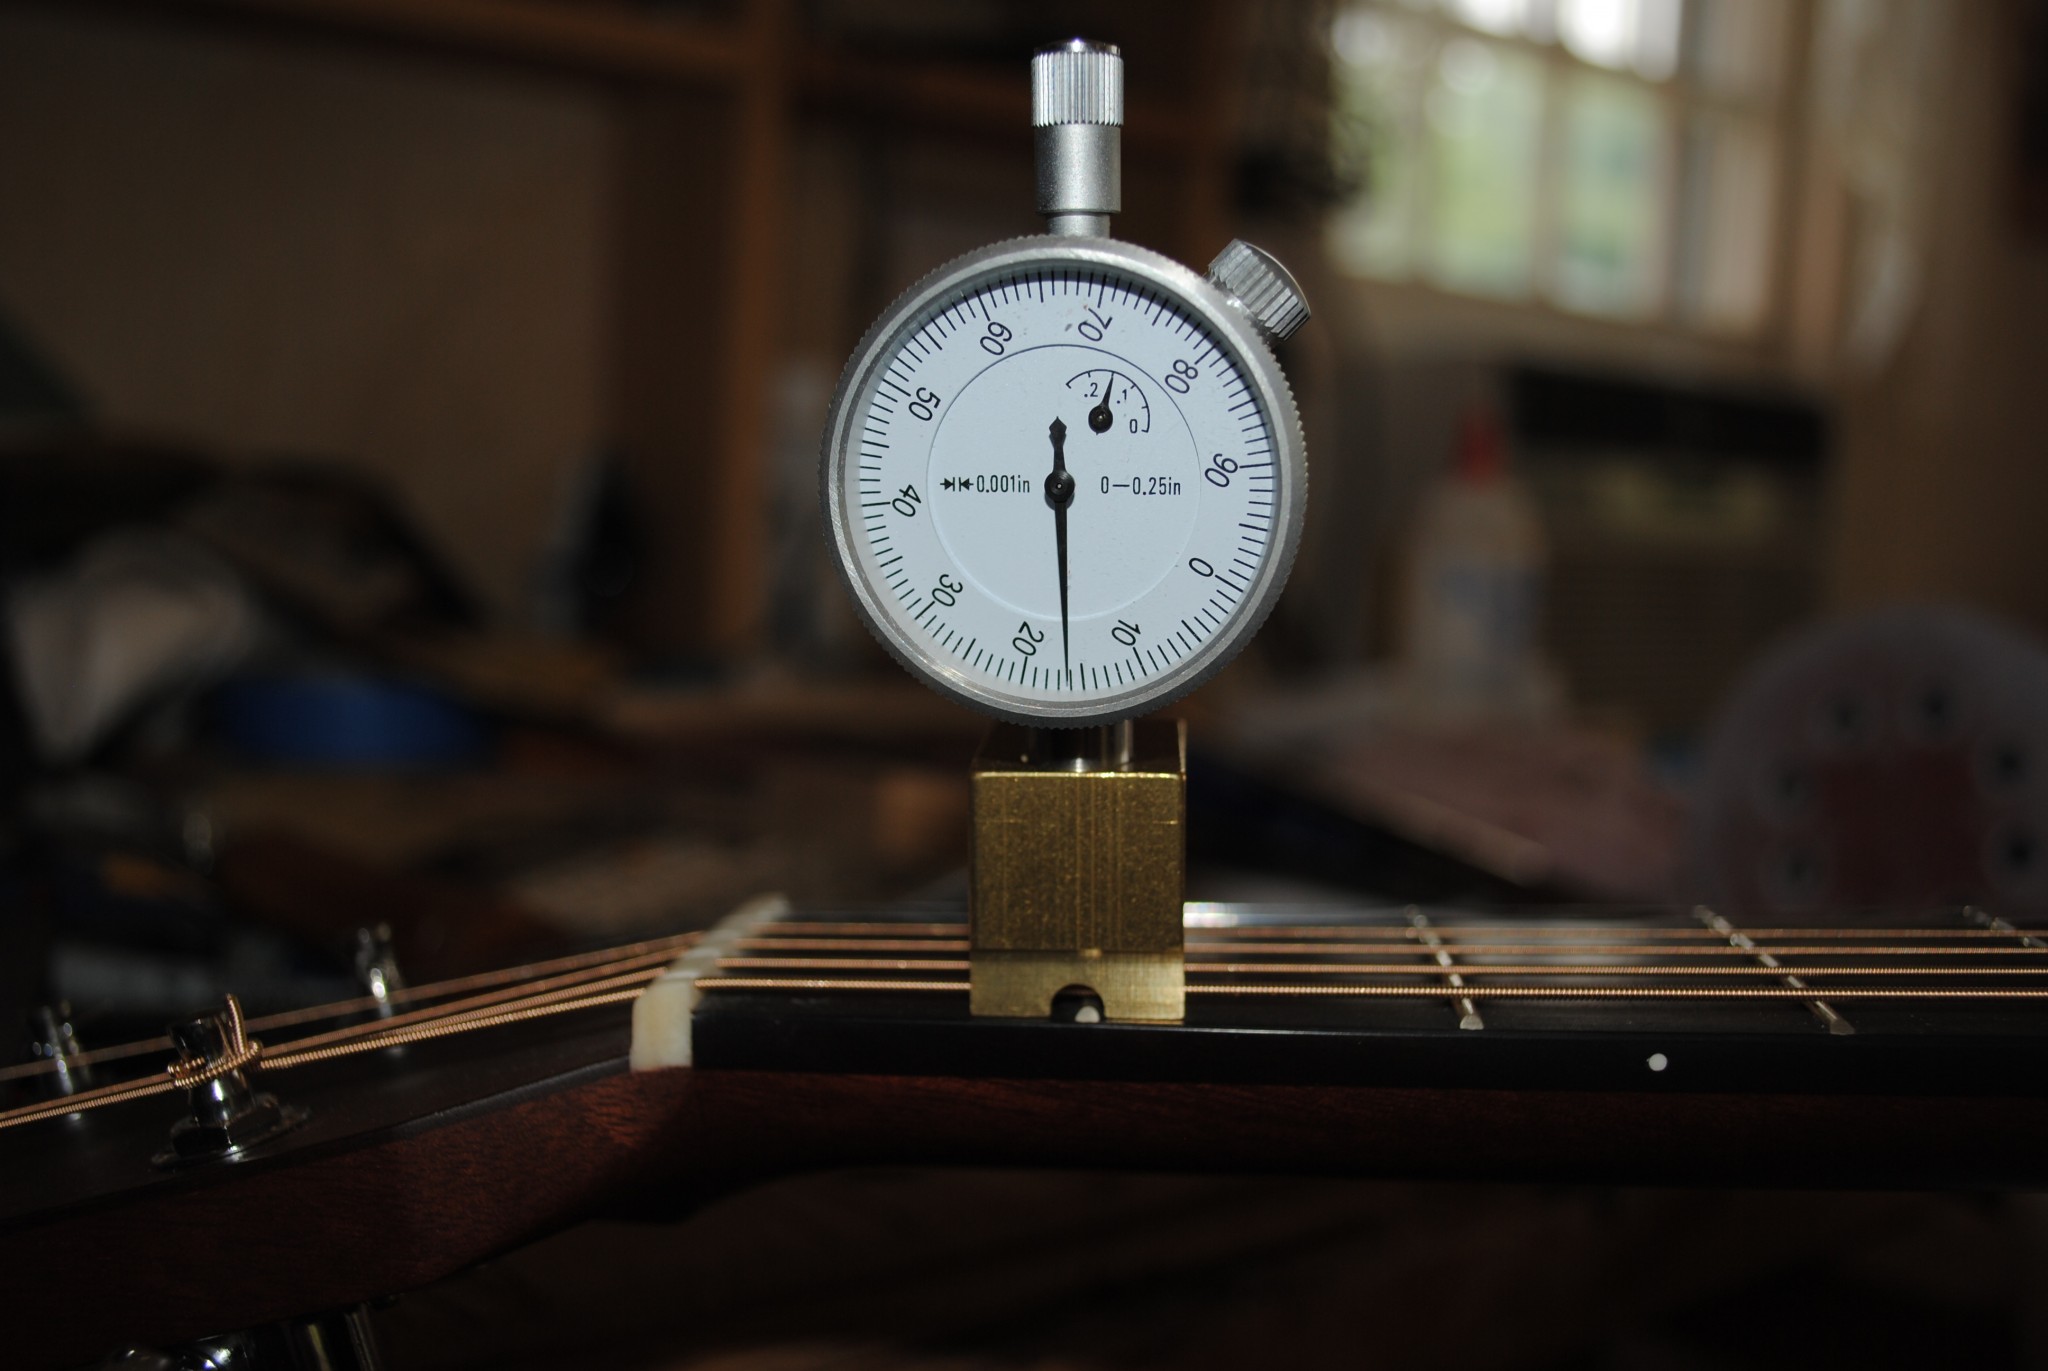
Most likely the culprit is the string’s contact point of the saddle is in the wrong position and moving contact edge of the saddle forward (towards the neck) or back (towards the guitars end) will correct the string length discrepancy.   This  is straightforward on most electric guitars as each string has it’s own separate saddle with an adjustment screw (Fig. 4).   Depending on which direction the screw is turned,  the saddle will move forward (shortening the vibration length) or back (lengthening the vibration length).

Figure 4
                                Figure 4.

Acoustic guitars do not have this option as all six strings share a single saddle (Fig. 5) and the saddle has to be carefully filed to put the string in the proper contact location on the top of the saddle.  This is best left to a professional.

Figure 5.
                               Figure 5.

So, there you have it.  You are now an intonation expert. Happy Playing!

–     Steve

Filed Under: Uncategorized

What is a Guitar Setup

December 12, 2013 By Steve Beckwith 3 Comments

A guitar set-up – what is it and why should I care?

In short, it’s the height of the strings above the frets along the entire fingerboard.   The string height is a matter of individual preference.  When properly set, it can be the difference between a struggle and pleasure when playing your guitar.

This discussion intended to explain a proper set-up and how to accomplish it.  It is not intended as a set-up tutorial.  Additionally, it is limited to an acoustic guitar set-up but the concepts are the same for an electric guitar.

There are three areas of concern in a guitar set-up:  (1) neck relief (straightness of the neck) and the string height at both the (2) lower and (3) upper frets regions of the neck.

Neck relief is the first item to be checked before any other adjustments are made.   If needed, a twist of the truss rod will correct any straightness issue.  However, don’t try doing this yourself before talking to a guitar tech.  Cranking on the truss-rod may seem to work, but using it as a method to set-up a guitar will cause playing problems (buzzing, etc.) further down the road. 

In some cases, the neck relief is so far out of alignment, no amount of adjusting the truss rod will correct it and the neck will need a “reset”.   Depending on construction of the guitar, this can be an expensive proposition.    However, this is fairly rare and is usually only required on older instruments.

Once the neck relief has been checked and adjusted.  The next step is to measure the height of the strings from the top of the 12th fret to the bottom of each string.    An “average” set-up height is 0.125 (8/64) inches on the low-E string. The remaining five strings are progressively lower.

Figure 1.  Measuring the string height from the top of the 12th fret to the bottom of the low-E string.
Figure 1. Measuring the string height from the top of the 12th fret to the bottom of the low-E string.

When I first started building, I set-up my guitars with this specification – expecting it to address all playing styles and then do another adjustment when it was sold if the customer preferred a higher or lower string height.    This didn’t last long.   To a person, the feedback on my guitars were “great sound, but the action is high”.   Soon, I began setting the action of new instruments to 6.5~7/64 of an inch.   Now the feedback is they sound great and are easy to play.

Setting the action at the 12th fret is accomplished by lowering (or raising) the height of the saddle.  In an acoustic guitar this is done by carefully removing material from the saddle. This is tricky business, in the event too much material is removed, string buzz will occur at the upper frets and a new bridge will have to be fabricated (some techs will “shim” the bridge, but a shim may not transfer string energy to the guitar top as efficiently as solid bone).  Once the height at the 12th fret is satisfactory.   The action at the lower frets can be adjusted.

Figure 2. Measuring the string height at the first fret with a custom micrometer. A ruler with 1/64-inch increments (Figure 1) or a feeler gauge will work just as well.
Figure 2.  Measuring the string height at the first fret with a custom micrometer. A ruler with 1/64-inch increments (Figure 1) or a feeler gauge will work just as well.

First, the string height over the 1st fret is measured.   I look for a string height of 0.015 to 0.020 inches from the bottom of the low E string to the top of the 1st fret.  The other two bass strings have similar parameters while the three treble strings have a lower height.

If the string height at the 1st fret is to high on a particular string, then the nut slot in which the string   sits, needs to be carefully filed down so the string sits lower in the nut.   It is to low (the string buzzes when unfretted), then the slot needs to be raised.

Once all adjustments have been made, I perform a final check on the guitar by simply playing it at various neck positions and also checking for buzzing by fretting each string up the neck and return the instrument back to the happy customer.

Keep playing!

-Steve


Filed Under: Guitars Tagged With: Guitar, Setup, String Height

  • « Previous Page
  • 1
  • 2

About

Beckwith StringsSteve Beckwith has handcrafted over one hundred acoustic stringed instruments to address the need of musicians unable to find the exact sound from mass manufacturing instruments.

Location and Appointments

Beckwith Strings
26 North Street
Grafton, MA 01519

By  Appointment  978-833-6383


Copyright © 2025 · Beckwith Strings · Grafton, MA 01519